2 CUDA Programming Model (Part II)
2.8 Handling Errors
CUDA kernel launch로 발생하는 error는 synchronous error와 asynchronos error 두 가지 type으로 나뉜다.
-
synchronous error: host에서 kernel이 illegal하거나 invalid한 것을 알게 되면 발생한다.
-
예를 들어 thread block size나 grid size를 너무 크게 설정했다면, kernel launch call이 실행되는 동시에 바로 synchronous error를 발생시킨다.
-
asynchronous error: kernel execution, 혹은 CUDA runtime asynchronous API execution 중 발생한다.
-
예를 들어 kernel execution 중 잘못된 memory address에 접근하면 발생할 수 있다. (cudaMemcpyAsync와 같은 CUDA runtime asynchronous API execution에서 발생할 수 있다.)
kernel launch call 바로 다음에 cudaGetLastError API를 사용해서 error capturing도 가능하다.
참고로 해결하기 어려운, not-recoverable error를 sticky error, recoverable한 error를 non-sticky error라고 지칭하기도 한다.
cudaMalloc에서 GPU memory 부족으로 일어나는 error는 non-sticky error에 해당한다. 반면 host process가 terminate되기 전까지 CUDA context가 corrupt되는 error는 sticky error에 해당한다.
대체로 kernel이 asynchronous하기 때문에, error가 어디서 발생했는지 알기 힘들다는 단점이 있다. 따라서 CUDA API call들을 검증하는 macro를 만들어서 사용하면 불편함을 줄일 수 있다.
#define CHECK(ans) { gpuAssert((ans), __FILE__, __LINE__); }
inline void gpuAssert(cudaError_t code, const char *file, int line, bool abort =true) {
    if (code != cudaSuccess) {
        fprintf(stderr, "GPUassert: %s %s %d\n", cudaGetErrorString(code), file, line);
        if (abort)
            exit(code);
    }
}
이렇게 만들었다면 다음과 같이 kernel을 감싸서 사용할 수 있다.
CHECK(cudaMemcpy(d_C, gpuRef, nBytes, cudaMemcpyHostToDevice));
debugging 목적으로 한정지으면, kernel error를 check하기 위해서 다음과 같은 테크닉을 사용할 수도 있다. 다음과 같이 preceding requested task가 끝날 때까지 host application을 막는 것이다.
kernel_function<<<grid, block>>>(argument list);
CHECK(cudaDeviceSynchronize());    // cudaError_t cudaDeviceSynchronize(void);는 바로 전 asynchronous CUDA operations의 error를 return한다.
2.9 compiling and Executing
📝 예제: vector addition
1차원 array A, B(즉, vector)의 vector addition을 수행한 뒤 연산 결과를 array C에 저장할 것이다. 연산은 host 버전 vector addition(sumArraysOnHost)과 GPU 버전 vector addition(sumArraysOnGPU)을 모두 수행한 뒤 서로의 연산 결과를 비교(checkResult)해 볼 것이다. 파일명은 sumArraysOnGPU-small-case.cu이다.
계산 결과의 신뢰성을 검토하려면 double type의 오차 허용 범위 내에서 비교를 하면 된다. 현재 예제에서는 오차의 절댓값을 1.0e-8 이하까지 허용하게 구성했다.
-
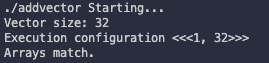
vector size: 32
-
다음과 같이 한 block이 32개의 element으로 구성되도록 했다.
c
  dim3 block (nElem);    // nElem = 32
  dim3 grid  (nElem/block.x);
-
아래와 같이 block당 1개의 element로 구성하는 대신, block을 32개로 설정해도 무방하다. 다만 kernel이 사용하는 index도 수정해야 한다.
```c dim3 block (1); dim3 grid (nElem);
//... int i = blockIdx.x; ```
#include <cuda_runtime.h>
#include <stdio.h>

#define CHECK(ans) { gpuAssert((ans), __FILE__, __LINE__); }
inline void gpuAssert(cudaError_t code, const char *file, int line, bool abort =true) {
    if (code != cudaSuccess) {
        fprintf(stderr, "GPUassert: %s %s %d\n", cudaGetErrorString(code), file, line);
        if (abort)
            exit(code);
    }
}

void checkResult(float *hostRef, float *gpuRef, const int N) {
    double epsilon = 1.0E-8;
    bool match = 1;
    for (int i = 0; i < N; i++) {
        if (abs(hostRef[i] - gpuRef[i]) > epsilon) {
            match = 0;
            printf("Arrays do not match!\n");
            printf("host %5.2f gpu %5.2f at current %d\n", hostRef[i], gpuRef[i], i);
            break;
        }
    }

    if (match) printf("Arrays match.\n\n");
}

void initialData(float *ip, int size) {
    // generate different seed for random number
    // Array에 random element를 채운다.
    time_t t;
    srand((unsigned) time(&t));

    for (int i = 0; i < size; i++) {
        ip[i] = (float)( rand() & 0xFF )/10.0f;
    }
}

void sumArraysOnHost(float *A, float *B, float *C, const int N) {
    // Array A, B의 각 element를 합산 = Array C
    for (int idx = 0; idx < N; idx++) {
        C[idx] = A[idx] + B[idx];
    }
}

__global__ void sumArraysOnGPU(float *A, float *B, float *C) {
    int i = threadIdx.x;
    C[i] = A[i] + B[i];
}

int main(int argc, char **argv) {
    printf("%s Starting...\n", argv[0]);

    // set up device
    int dev = 0;
    cudaSetDevice(dev);

    // set up data size of vectors
    int nElem = 32;
    printf("Vector size: %d\n", nElem);

    // malloc host memory
    size_t nBytes = nElem * sizeof(float);

    float *h_A, *h_B, *hostRef, *gpuRef;
    h_A     = (float *)malloc(nBytes);
    h_B     = (float *)malloc(nBytes);
    hostRef = (float *)malloc(nBytes);
    gpuRef  = (float *)malloc(nBytes);

    // initialize data at host side
    initialData(h_A, nElem);
    initialData(h_B, nElem);

    memset(hostRef, 0, nBytes);
    memset(gpuRef, 0, nBytes);

    // malloc device global memory
    float *d_A, *d_B, *d_C;
    cudaMalloc((float**)&d_A, nBytes);
    cudaMalloc((float**)&d_B, nBytes);
    cudaMalloc((float**)&d_C, nBytes);

    // transfer data from host to device
    cudaMemcpy(d_A, h_A, nBytes, cudaMemcpyHostToDevice);
    cudaMemcpy(d_B, h_B, nBytes, cudaMemcpyHostToDevice);

    // invoke kernel at host side
    dim3 block (nElem);
    dim3 grid  (nElem/block.x);

    sumArraysOnGPU<<< grid, block >>>(d_A, d_B, d_C);
    printf("Execution configuration <<<%d, %d>>>\n", grid.x, block.x);

    // copy kernel result back to host side
    cudaMemcpy(gpuRef, d_C, nBytes, cudaMemcpyDeviceToHost);

    // add vector at host side for result checks
    sumArraysOnHost(h_A, h_B, hostRef, nElem);

    // check device results
    checkResult(hostRef, gpuRef, nElem);

    // free device global memory
    cudaFree(d_A);
    cudaFree(d_B);
    cudaFree(d_C);

    // free host memory
    free(h_A);
    free(h_B);
    free(hostRef);
    free(gpuRef);

    return(0);
}
다음과 같이 compile해서 실행하면 된다.
$ nvcc sumArraysOnGPU-small-case.cu -o addvector
$ ./addvector
결과는 다음과 같다.
2.10 timing kernel
kernel이 얼마나 시간을 소모하는지, 어느 정도가 적정한 소모 시간인지를 알아야 한다. host side에서 CPU timer나 GPU timer를 사용하면 매우 쉽게 소모한 시간을 알 수 있다.
2.10.1 timing with CPU timer
sys/time.h 라이브러리의 gettimeofday()를 이용해서 CPU timer를 만들 수 있다.
double cpuSecond() {
    struct timeval tp;
    gettimeofday(&tp, NULL);
    return ((double)tp.tv_sec + (double)tp.tv_usec*1.e-6);
}
이렇게 timer를 만들었다면 kernel을 시작하는 시간을 기록한 뒤, 끝난 시점에서 두 시간의 차이를 측정하면 kernel 수행 시간을 알 수 있다.
double iStart = cpuSecond();
kernel_name<<<grid, block>>>(argument list);
cudaDeviceSynchronize();
double iElaps = cpuSecond() - iStart;
하지만 이렇게 시간을 측정할 경우, CPU가 모든 GPU thread가 작업을 완료할 때까지 기다리도록 cudaDeviceSynchronize()를 꼭 사용해야 한다.
📝 예제: vector addition 시간 측정하기
-
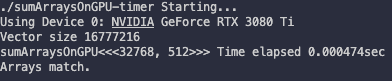
비트 연산자를 이용해서 element를 약 1600만 개로 설정한다.(16,777,216개)
c int nElem = 1<<24; -
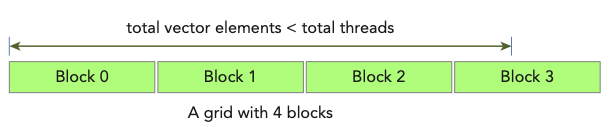
kernel의 vector addition 때, array bound를 넘어가지 않도록 꼭 index를 점검해야 한다.(total thread 개수가 vector element 개수보다 많기 때문)
c
   __global__ void sumArraysOnGPU(float *A, float *B, float *C, const int N) {
    int i = blockIdx.x * blockDim.x + threadIdx.x;
    if (i < N) {
        C[i] = A[i] + B[i];    //
    }
   }
아래 그림을 보면 이해가 쉽다.
다음은 sumArraysOnGPU-timer.cu 코드이다. 앞서 본 몇 가지 function은 생략해서 기록했다.
#include <cuda_runtime.h>
#include <stdio.h>
#include <sys/time.h>

// error handling을 위한 CHECK macro 생략

// CPU timer 역햘을 하는 cpuSecond() 생략

// random element를 생성하는 initialData() 생략

// host side에서 vector addition을 수행하는 sumArraysOnHost() 생략

// device side에서 vector addition을 수행하는 sumArraysOnGPU() 생략

// host/device의 vector addition 결과를 비교하는 checkResult() 생략

int main(int argc, char **argv) {
    printf("%s Starting...\n", argv[0]);

    // set up device
    int dev = 0;
    cudaDeviceProp deviceProp;
    CHECK(cudaGetDeviceProperties(&deviceProp, dev));
    printf("Using Device %d: %s\n", dev, deviceProp.name);
    CHECK(cudaSetDevice(dev));

    // set up data size of vectors
    int nElem = 1<<24;
    printf("Vector size %d\n", nElem);

    // malloc host memory
    size_t nBytes = nElem * sizeof(float);

    float *h_A, *h_B, *hostRef, *gpuRef;
    h_A     = (float *)malloc(nBytes);
    h_B     = (float *)malloc(nBytes);
    hostRef = (float *)malloc(nBytes);
    gpuRef  = (float *)malloc(nBytes);

    double iStart, iElaps;

    // initialize data at host side
    iStart = cpuSecond();
    initialData(h_A, nElem);
    initialData(h_B, nElem);
    iElaps = cpuSecond() - iStart;

    memset(hostRef, 0, nBytes);
    memset(gpuRef,  0, nBytes);

    // add vector at host side for result checks
    iStart = cpuSecond();
    sumArraysOnHost(h_A, h_B, hostRef, nElem);
    iElaps = cpuSecond() - iStart;

    // malloc device global memory
    float *d_A, *d_B, *d_C;
    cudaMalloc((float**)&d_A, nBytes);
    cudaMalloc((float**)&d_B, nBytes);
    cudaMalloc((float**)&d_C, nBytes);

    // transfer data from host to device
    cudaMemcpy(d_A, h_A, nBytes, cudaMemcpyHostToDevice);
    cudaMemcpy(d_B, h_B, nBytes, cudaMemcpyHostToDevice);

    // invoke kernel at host side
    int iLen = 1024;
    dim3 block(iLen);
    dim3 grid ((nElem + block.x - 1)/block.x);

    iStart = cpuSecond();
    sumArraysOnGPU<<<grid, block>>>(d_A, d_B, d_C, nElem);
    cudaDeviceSynchronize();
    iElaps = cpuSecond() - iStart;
    printf("sumArraysOnGPU<<<%d, %d>>> Time elapsed %f" \
        "sec\n", grid.x, block.x, iElaps);

    // copy kernel result back to host side
    cudaMemcpy(gpuRef, d_C, nBytes, cudaMemcpyDeviceToHost);

    // check device results
    checkResult(hostRef, gpuRef, nElem);

    // free device global memory
    cudaFree(d_A);
    cudaFree(d_B);
    cudaFree(d_C);

    // free host memory
    free(h_A);
    free(h_B);
    free(hostRef);
    free(gpuRef);

    return(0);
}
다음과 같이 compile 후 실행한다.
$ nvcc sumArraysOnGPU-timer.cu -o sumArraysOnGPU-timer
$ ./sumArraysOnGPU-timer

예제대로 구성하면 1D grid가 16,384개의 block을 갖는다. 그리고 각 block은 thread 1,024개를 가진다.)
여기서 1 block이 갖는 thread 수를 절반으로 줄이는 대신, block 수를 2배로 늘리면 소요되는 시간이 달라진다.(iLen = 512)
Tesla device 기준으로는 0.002058 sec에서 0.000183 sec로 줄어들었다.
이보다 더 thread 수(block dimension)를 줄이고, block 수(grid dimension)를 늘리게 되면 device에 따라 오류가 발생할 수 있다. device에 따라 각 thread hierarchy level의 maximum size가 다르므로 유의해야 한다.

예를 들어 Tesla device는 block이 가질 수 있는 thread 수의 한계가 1,024개이며, grid dimension 수치는 각 x,y,z 차원에서 최대 65,535까지만 가능하다.
2.10.2 timing with nvprof
CUDA 5.0부터 nvprof를 이용해서 application의 CPU와 GPU activity timeline을 알 수 있게 되었다. 다음과 같이 사용할 수 있다.
$ nvprof [nvprof_args] <application> [application_args]
\$ nvprof --help 명령으로 더 자세하게 알 수 있다.
앞선 예제를 nvprof로 살펴볼 수 있다.
$ nvprof ./sumArraysOnGPU-timer
위 명령을 입력해서 Tesla GPU에서 살펴본 결과는 다음과 같다. 절반은 program output을 담은 message이고, 나머지가 nvprof의 output에 해당한다.

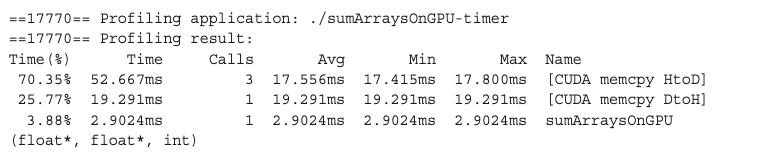
- 2.9024ms: nvprof가 측정한 kernel time
nvprof의 측정 값인 2.9024ms는 CPU timer로 측정한 kernel time인 3.26ms와 다르다. 이는 CPU timer output이 nvprof 처리를 위해 때문에 생기는 overhead를 포함하기 때문이다.(따라서 nvprof의 결과가 더 정확하다.)
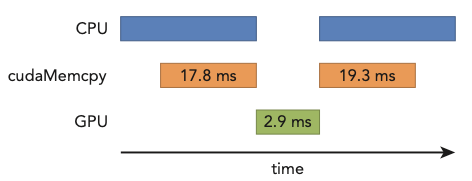
kernel 수행보다도 host와 device 사이에서 일어나는 data transfer가 훨씬 시간을 잡아먹었다는 점을 기억하자.
📝 예제:nvprof를 이용하여 theoretical limit과 비교하기
nvprof를 이용해서 application의 instruction과 memory throughput을 계산할 수 있다. 이 계산을 theoretical peak value(이론적인 한계값)와 비교하면, application이 어떤 제약을 받고 있는지 알 수 있다.
계산은 Tesla K10을 기준으로 살펴볼 것이다.
-
Tesla K10 Peak Single Precision FLOPS
= 745 MHz core clock * 2 GPUs/board * (8 multiprocessors * 192 fp32 cores/multiprocessor) * 2ops/cycle = 4.58TFLOPS
-
Tesla K10 Peak Memory Bandwidth
= 2 GPUs/board * 256 bit * 2500 MHz mem-clock * 2 DDR / 8bits/byte = 320 GB/s
-
Ratio of instruction:bytes
= 4.58 TFLOPS / 320 GB/s
13.6 instructions:1 byte
즉, Tesla K10은 byte access마다 instruction 13.6개 이상을 issue(투입) 가능하다.
2.11 organizing parallel threads
앞서 vector addition에서는 kernel에 알맞는 grid, block size를 지정해서 계산했다. 이때 grid size는 block size와 vector size에 의해 결정되었다.
그렇다면 matrix addition은 어떻게 계산할까? 일반적으로 2D grid나 2D block을 이용해서 해결할 수 있다.
-
2D grid with 2D blocks
-
1D grid with 1D blocks
-
2D grid with 1D blocks
일반적으로 2D array 형태의 data(image pixel 등)라면, 2D block으로 구성된 2D grid를 사용하는 편이 편리하다. 가령 76x62 pixel이 있다고 하자. 이를 16x16 thread로 구성된 block으로 나누면 어떻게 될까?
![]()
-
회색으로 칠해진 부분이 pixel data(76x62)를 의미한다.
-
x축으로는 5개의 block이 필요하다.
-
y축으로는 4개의 block이 필요하다.
-
즉, 이 pixel data를 처리하기 위해서는 5*4 = 20개의 block이 필요하다.
여전히 data 수보다 thread 수가 더 많다는 점에 유의하자.
pixel data를 Pin이라고 한다면, block(1,0)에 있는 thread(0,0)의 Pin element는 다음과 같이 index할 수 있다.
-
blockIdx.y * blockDim.y + threadIdx.y = 1 * 16 + 0 = 16
-
blockIdx.x * blockDim.x + threadIdx.x = 0 * 16 + 0 = 0
2.11.1 indexing matrices with blocks and threads

matrix가 있다고 가정하자. matrix addition kernel에서도 thread는 주로 하나의 data element를 처리한다. matrix 계산을 위해서는 다음 세 가지를 정해야 한다.
-
thread and block index
-
coordinate of a given point in the matrix
-
offset in linear global memory
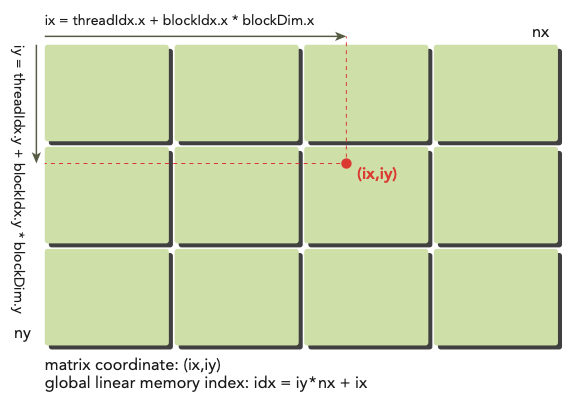
다음 과정을 통해서 global memory에 matrix를 mapping할 수 있다.( 이므로 nx = 8, ny = 6으로 사용한다. )
-
matrix coordinate에 맞춰서 thread와 block index를 지정한다.
-
ix = threadIdx.x + blockIdx.x * blockDim.x
-
iy = threadIdx.y + blockIdx.y * blockDim.y
-
-
global matrix에 이를 mapping한다.
- idx = iy * nx + ix
참고로 printThreadInfo() function을 사용하면 관련된 여러 정보를 알 수 있다.
-
thread index
-
block index
-
matrix coordinate
-
global linear memory offset
-
value of corresponding elements
📝 예제: matrix element printing
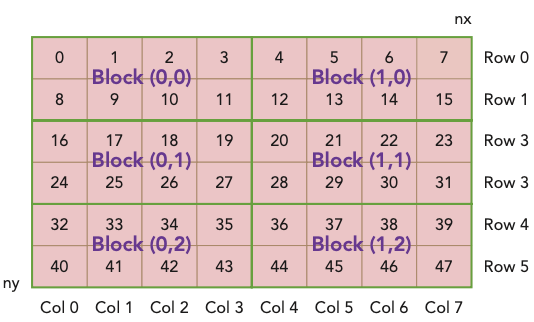
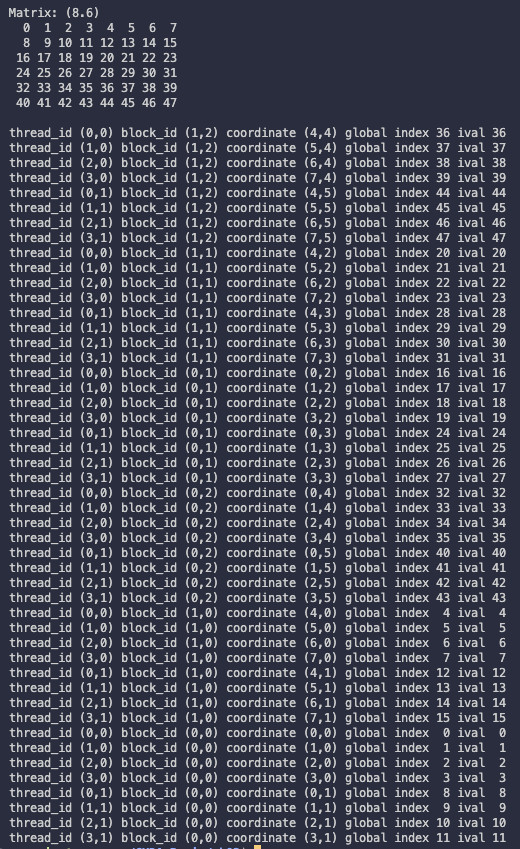
이제 다음과 같은 matrix의 element를 출력해 보며 index를 확인할 것이다. 파일명은 'checkThreadIndex.cu'이다.
-
1 block은 thread로 구성된다.
-
grid는 block으로 구성된다.( 즉, )
도중에 cudaDeviceProp()을 이용해 device 정보를 query할 것이다.
#include <cuda_runtime.h>
#include <stdio.h>

#define CHECK(ans) { gpuAssert((ans), __FILE__, __LINE__); }
inline void gpuAssert(cudaError_t code, const char *file, int line, bool abort =true) {
    if (code != cudaSuccess) {
        fprintf(stderr, "GPUassert: %s %s %d\n", cudaGetErrorString(code), file, line);
        if (abort)
            exit(code);
    }
}

// host에서 matrix element를 채울 function
void initialInt(int *ip, int size) {
    for (int i = 0; i < size; i++) {
        ip[i] = i;
    }
}

// host에서 matrix element를 print할 function
void printMatrix(int *C, const int nx, const int ny) {
    int *ic = C;
    printf("\nMatrix: (%d.%d)\n", nx, ny);
    for (int iy = 0; iy < ny; iy++) {
        for (int ix = 0; ix < nx; ix++) {
            printf("%3d", ic[ix]);
        }
        ic += nx;
        printf("\n");
    }
    printf("\n");
}

// device에서 matrix element를 print할 kernel
__global__ void printThreadIndex(int *A, const int nx, const int ny) {
    int ix = threadIdx.x + blockIdx.x * blockDim.x;
    int iy = threadIdx.y + blockIdx.y * blockDim.y;
    unsigned int idx = iy*nx + ix;

    // printf function 사용에 유의
    printf("thread_id (%d,%d) block_id (%d,%d) coordinate (%d,%d) "
        "global index %2d ival %2d\n", threadIdx.x, threadIdx.y, blockIdx.x,
        blockIdx.y, ix, iy, idx, A[idx]);
}

int main(int argc, char **argv) {
    printf("%s Starting...\n", argv[0]);

    // get device information
    int dev = 0;
    cudaDeviceProp deviceProp;
    CHECK(cudaGetDeviceProperties(&deviceProp, dev));
    printf("Using Device %d: %s\n", dev, deviceProp.name);
    CHECK(cudaSetDevice(dev));

    // set matrix dimension
    int nx = 8;
    int ny = 6;
    int nxy = nx*ny;
    int nBytes = nxy * sizeof(float);

    // malloc host memory
    int *h_A;
    h_A = (int *)malloc(nBytes);

    // initialize host matrix with integer
    initialInt(h_A, nxy);
    printMatrix(h_A, nx, ny);

    // malloc device memory
    int *d_MatA;
    cudaMalloc((void **)&d_MatA, nBytes);

    // transfer data from host to device
    cudaMemcpy(d_MatA, h_A, nBytes, cudaMemcpyHostToDevice);

    // set up execution configuration
    dim3 block(4, 2);
    dim3 grid((nx + block.x - 1)/block.x, (ny + block.y - 1)/block.y);

    // invoke the kernel
    printThreadIndex<<<grid, block>>>(d_MatA, nx, ny);
    cudaDeviceSynchronize();

    // free host and device memory
    cudaFree(d_MatA);
    free(h_A);

    // reset device
    cudaDeviceReset();

    return(0);
}
다음과 같이 compile한 뒤 실행한다.
$ nvcc -arch=sm_80 checkThreadIndex.cu -o checkIndex
$ ./checkIndex
2.11.2 summing matrices with 2D grid and 2d blocks
📝 예제: matrix addition(2D grid, 2D blocks)
2D grid와 2D block으로 구성한 kernel로 matrix addition을 수행한다. host side에서도 동일한 연산을 수행한 뒤, kernel 결과와 비교하여 제대로 수행이 됐는지 확인할 것이다.
-
matrix size는 16,384 element를 갖는다.
c int nx = 1<<14; int ny = 1<<14; -
1 block은 (32, 32) thread를 갖는다.
-
1 grid는 block을 (nx + block.x - 1)/block.x, (ny + block.y - 1)/block.y 만큼 갖는다.(512, 512)
우선 host의 matrix addition function은 다음과 같다.
// host side에서 matrix addition 수행
void sumMatrixOnHost(float *A, float *B, float *C, const int nx, const int ny) {
    float *ia = A;
    float *ib = B;
    float *ic = C;

    for (int iy = 0; iy < ny; iy++){
        for (int ix = 0; ix < nx; ix++){
            ic[ix] = ia[ix] + ib[ix];
        }
        ia += nx;
        ib += nx;
        ic += nx;
    }
}
device의 matrix addtion kernel은 다음과 같다.
__global__ void sumMatrixOnGPU2D(float *MatA, float *MatB, float *MatC, int nx, int ny){
    unsigned int ix = threadIdx.x + blockIdx.x * blockDim.x;
    unsigned int iy = threadIdx.y + blockIdx.y * blockDim.y;
    unsigned int idx = iy*nx + ix;

    if (ix < nx && iy < ny){
        MatC[idx] = MatA[idx] + MatB[idx];
    }
}
아래는 matrix addition을 수행하는 sumMatrixOnGPU-2D-grid-2D-block.cu code이다.
// include 생략
// error handling을 위한 CHECK macro 생략
// host와 device의 matrix addition function 생략(sumMatrixOnHost, sumMatrixOnGPU2D)
// CPU timer인 CPUsecond() function 생략
// matrix에 element를 생성하는 initialData() function 생략
// host와 device의 결과를 비교하는 checkResult() function 생략

int main(int argc, char** argv){
    printf("%s Starting...\n", argv[0]);

    // set up device
    int dev = 0;
    cudaDeviceProp deviceProp;
    CHECK(cudaGetDeviceProperties(&deviceProp, dev));
    printf("Using Device %d: %s\n", dev, deviceProp.name);
    CHECK(cudaSetDevice(dev));

    // set up data size of matrix
    int nx = 1<<14;
    int ny = 1<<14;

    int nxy = nx*ny;
    int nBytes = nxy * sizeof(float);
    printf("Matrix size: nx %d ny %d\n", nx, ny);

    // malloc host memory
    float *h_A, *h_B, *hostRef, *gpuRef;
    h_A = (float *)malloc(nBytes);
    h_B = (float *)malloc(nBytes);
    hostRef = (float *)malloc(nBytes);
    gpuRef = (float *)malloc(nBytes);

    // initialize data at host side
    double iStart = cpuSecond();
    initialData(h_A, nxy);
    initialData(h_B, nxy);
    double iElaps = cpuSecond() - iStart;

    memset(hostRef, 0, nBytes);
    memset(gpuRef, 0, nBytes);

    // add matrix at host side for result checks
    iStart = cpuSecond();
    sumMatrixOnHost(h_A, h_B, hostRef, nx, ny);
    iElaps = cpuSecond() - iStart;

    // malloc device global memory
    float *d_MatA, *d_MatB, *d_MatC;
    cudaMalloc((void **)&d_MatA, nBytes);
    cudaMalloc((void **)&d_MatB, nBytes);
    cudaMalloc((void **)&d_MatC, nBytes);

    // transfer data from host to device
    cudaMemcpy(d_MatA, h_A, nBytes, cudaMemcpyHostToDevice);
    cudaMemcpy(d_MatB, h_B, nBytes, cudaMemcpyHostToDevice);

    // invoke kernel at host side
    int dimx = 32;
    int dimy = 32;
    dim3 block(dimx, dimy);
    dim3 grid ((nx + block.x - 1)/block.x, (ny + block.y - 1)/block.y);

    iStart = cpuSecond();
    sumMatrixOnGPU2D<<<grid, block>>>(d_MatA, d_MatB, d_MatC, nx, ny);
    cudaDeviceSynchronize();
    iElaps = cpuSecond() - iStart;
    printf("sumMatrixOnGPU<<<(%d,%d), (%d,%d)>>> elapsed %f sec\n",
        grid.x, grid.y, block.x, block.y, iElaps);

    // copy kernel result back to host side
    cudaMemcpy(gpuRef, d_MatC, nBytes, cudaMemcpyDeviceToHost);

    // check device results
    checkResult(hostRef, gpuRef, nxy);

    // free device global memory
    cudaFree(d_MatA);
    cudaFree(d_MatB);
    cudaFree(d_MatC);

    // free host memory
    free(h_A);
    free(h_B);
    free(hostRef);
    free(gpuRef);

    // reset device
    cudaDeviceReset();

    return(0);
}
다음과 같이 compile한 뒤 실행한다.
$ nvcc -arch=sm_80 sumMatrixOnGPU-2D-grid-2D-block.cu -o matrix2D
$ ./matrix2D

block dimension을 32x16으로 한 뒤(block은 512x1024가 된다.). recompile해서 실행하면 시간은 약 1/2배 정도로 줄어든다. 직관적으로 생각해도 parallelism이 두 배 늘었기 떄문에 시간이 줄었다는 사실을 알 수 있다.
위 서술은 Tesla device 기준으로 줄어든 시간이다. 0.060323 sec에서 0.038041 sec로 줄어든다.

그러나 16x16으로 block dimension을 지정한 뒤(block은 1024x1024가 된다.), recompile하고 실행하면 오히려 시간이 더 늘어난다. 처음과 비교하면 block이 4배가 되며 parallelism이 늘었는데 어째서 이런 결과가 나오는 것일까? (ch03 참조)

Fermi device에서 수행한 결과는 다음과 같다.
| kernel configuration | kernel elapsed time | block number |
|---|---|---|
| (32,32) | 0.060323 sec | 512x512 |
| (32,16) | 0.038041 sec | 512x1024 |
| (16,16) | 0.045535 sec | 1024x1024 |
2.11.3 summing matrices with a 1D grid and 1D blocks
📝 예제: matrix addition(1D grid, 1D blocks)
앞선 2D grid, 2D blocks 예제를 1D grid, 1D blocks로 변형해서 matrix addition을 수행한다.(파일명은 sumMatrixOnGPU-1D-grid-1D-block.cu)
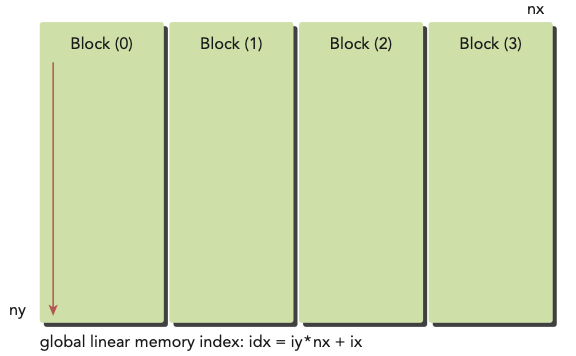
이와 같이 1D grid, 1D block으로 구성한다면, kernel의 index를 다르게 구성해야 한다.(1D block은 오직 threadIdx.x만 index 계산에 쓸 수 있게 된다.)
__global__ void sumMatrixOnGPU1D(float *MatA, float *MatB, float *MatC,
    int nx, int ny) {
    unsigned int ix = threadIdx.x + blockIdx.x * blockDim.x;

    if (ix < nx) {
        for (int iy  = 0; iy < ny; iy++) {
            int idx = iy*nx + ix;
            MatC[idx] = MatA[idx] + MatB[idx];
        }
    }
}
다음과 같이 block configuration을 설정한다.
dim3 block(32,1);
dim3 grid ((nx + block.x - 1)/block.x,1);
-
1 block은 32개 thread를 갖는다.
-
1 grid는 (nx + block.x - 1)/block.x개의 block을 갖는다.
kernel 명칭이 바뀐 것에 주의한다.
sumMatrixOnGPU1D<<<grid, block>>>(d_MatA, d_MatB, d_MatC, nx, ny);
작성을 완료하면 compile해서 실행한다.
$ nvcc -arch=sm_80 sumMatrixOnGPU-1D-grid-1D-block.cu -o matrix1D
$ ./matrix1D

사실 결과를 보면 알 수 있지만, 이는 2D grid, 2D block (32x32)과 구조적으로 차이가 없다. 하지만 연산 시간에서 차이를 보인다.
block(128,1)로 변경해서 수행을 하면 조금 더 빨라지는 모습을 발견할 수 있다.
dim3 block(128,1);
dim3 grid ((nx + block.x - 1)/block.x,1);

Tesla device 기준으로 0.061352 sec에서 0.044701 sec로 빨라진다.
2.11.4 summing matrices with a 2D grid and 1D blocks
📝 예제: matrix addition(2D grid, 1D blocks)
앞선 2D grid, 2D blocks 예제를 2D grid, 1D blocks로 변형해서 matrix addition을 수행한다.(파일명은 sumMatrixOnGPU-2D-grid-1D-block.cu)
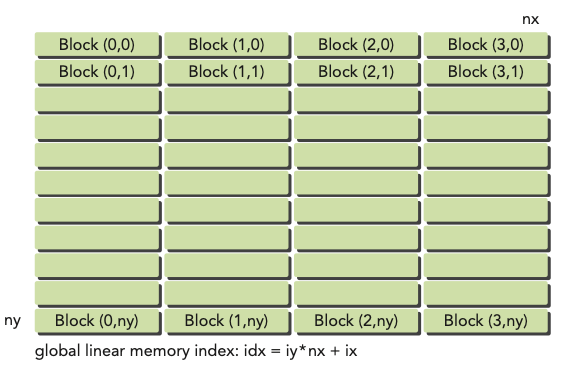
이 경우 matrix coordinate mapping(ix, iy)이 다음과 같이 바뀐다.
ix = threadIdx.x + blockIdx.x * blockDim.x;
iy = blockIdx.y;
다음과 같이 block과 grid size를 지정한다.
dim3 block(32);
dim3 grid((nx + block.x - 1)/block.x,ny);
global linear memory offset은 마찬가지다. 변경 사항을 반영한 kernel은 다음과 같다.
사실 아래와 같이 변경하지 않아도 sumMatrixOnGPU2D로 동작시킬 수 있다. 대신 바꾼 kernel이 thread마다 integer multiplication 연산 1개, integer addition 연산 1개를 덜 수행하는 이점을 갖는다.
__global__ void sumMatrixOnGPUMix(float *MatA, float *MatB, float *MatC,
    int nx, int ny) {
    unsigned int ix = threadIdx.x + blockIdx.x * blockDim.x;
    unsigned int iy = blockIdx.y;
    unsigned int idx = iy*nx + ix;

    if (ix < nx && iy < ny){
        MatC[idx] = MatA[idx] + MatB[idx];
    }
}
kernel invoke는 다음과 같다.
sumMatrixInGPUMix<<<grid, block>>>(d_MatA, d_MatB, d_MatC, nx, ny);
compile하고 실행한다.
$ nvcc -arch=sm_80 sumMatrixOnGPU-2D-grid-1D-block.cu -o mat2D1D
$ ./mat2D1D

참고로 block size를 256으로 늘리면 시간이 더 감소한다.

Tesla 기준으로 0.073727 sec에서 0.030765 sec가 된다.
아래는 Fermi device에서 grid, block dimension을 바꾸며 수행한 결과를 정리한 표다.
| kernel | execution comfigure | time elapsed |
|---|---|---|
| sumMatrixOnGPU2D | (512, 1024), (32,16) | 0.038041 |
| sumMatrixOnGPU1D | (128, 1), (128,1) | 0.044701 |
| sumMatrixOnGPUMix | (64, 16384), (256,1) | 0.030765 |
이를 통해 알 수 있는 점은 다음과 같다.
-
execution configuration을 바꾸면 performance에 영향을 미친다.
-
일반적으로 최적의 configuration을 찾지 않으면 best performance을 얻을 수 없다.
-
grid와 block dimension을 바꾸는 것으로도 performance를 향상시킬 수 있다.